


Why would one want to learn how to factory reset MacBook Air? You may want to Factory Reset your MacBook Air for various reasons. Like selling, or trading it or giving away to others or some issue with it that you cannot solve. So, to solve this dilemma down are the steps to follow for you to Factory Reset MacBook Air safely and accurately.
Things to Do Before Factory Reset Your MacBook Air
Before you Factory Reset your MacBook Air for any reason you should take care of below things for added precautions.
- Backup or transfer files – Taking a backup of your precious data is always of paramount importance. No matter what the reasons might be, taking a backup will save your day on unfortunate events. Transferring the files into external storage or cloud storage would come in handy when you lose all your data after Factory Reset.
- Sign out of iTunes – Launch iTunes app and go to Account > Authorization > Deauthorize This Computer option. Provide login credentials and select Deauthorize to sign out of iTunes. If your MacBook Air is on the latest macOS Catalina or later, then you can skip this step.
- Sign out of iCloud – For macOS Catalina or later: Go to Apple Menu > System Preferences, then Select Apple ID. On the sidebar select Overview and Click Sign Out. For earlier macOS versions: Go to Apple Menu > System Preferences, Select iCloud and Click Sign Out. This will ask you if you want to keep a copy of iCloud on MacBook Air, but it will be erased after Factory Reset anyways. But all your iCloud data will remain in iCloud to be accessed from other devices with Apple ID.
- Sign out of iMessage – This is pretty straight forward process, Launch Messages app, then select Messages > Preferences on Menu bar. Click on iMessage, then select Sign Out.
- Unpair Bluetooth devices – You should unpair all the connected Bluetooth devices to your MacBook Air, so that it will not prevent accidental inputs while the Factory Reset process. Go to Apple Menu > System Preferences, and click on Bluetooth. Select the Bluetooth device to unpair and click on the Remove button on the device name.
- Reset NVRAM – Before running Factory Reset on your MacBook Air, consider to clear all user settings and security features that might have been altered by you. By resetting NVRAM, all these will be restored to default settings. To Rest NVRAM, Restart your MacBook Air and immediately press and hold four keys together while it is Turning on :
Option + Command + P + R Keys. Release these keys after 20 secs to clear all the user settings and restore security features.

Easy Steps to Factory Reset MacBook Air –
# To Factory Reset your MacBook Air with an earlier version of macOS than Monterey then follows below steps.
Step 1 : Enter Recovery Mode
- First make sure your MacBook Air is connected to the power source to prevent any accidental low battery situation. To enter Recovery Mode of your MacBook Air, you should restart your MacBook Air. Immediately press and hold Command and R keys until you see an Apple logo and a progress indicator.

- If prompted to select the User, then login with your credentials for accessing the Administrator account.
- After that your MacBook Air is in Recovery Mode with options to erase Disk and reinstall macOS.
Step 2 : Select Disk Utility Window
- Once you enter Recovery Mode, you will be presented with Four options, such as Restore from Time Machine, Reinstall macOS, Safari and Disk Utility.
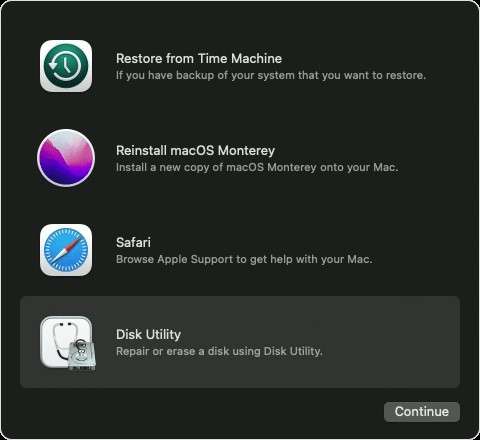
- Among these 4 options Select Disk Utility at the bottom and Click on Continue at bottom right corner.
- At the Disk Utility window you will be able to find all the Disks available. Select Macintosh HD (Unless you have named your internal drive something else) in the sidebar. The complete disk information will be shown in the middle along with various tabs at the top toolbar.
- Click on the Erase Button at the top toolbar, to start erasing data from the selected drive.

- When prompted, provide the requested details such as Name : Macintosh HD, Format : APFS or macOS Extended (Journaled), as officially recommended by Disk Utility.
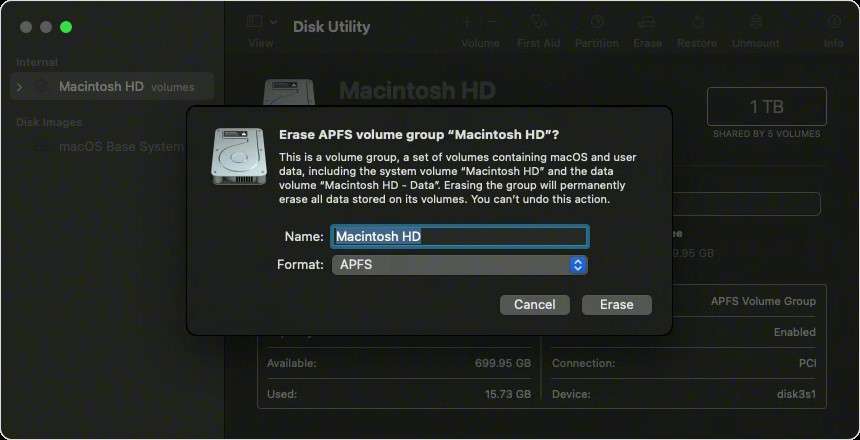
- Click on Erase Button. Although if you see ‘Erase Volume Group Button’, then click that button.
- Again if prompted to login with Apple ID then provide the details to continue.
- Wait till the disk erase is completed and select the Done button. If you see any other internal volumes in the sidebar, then select the Delete volume button to delete that volume as well.
- Quit Disk Utility to go back to the Recovery Mode Main window.
Step 3 : Enter Reinstall macOS Window
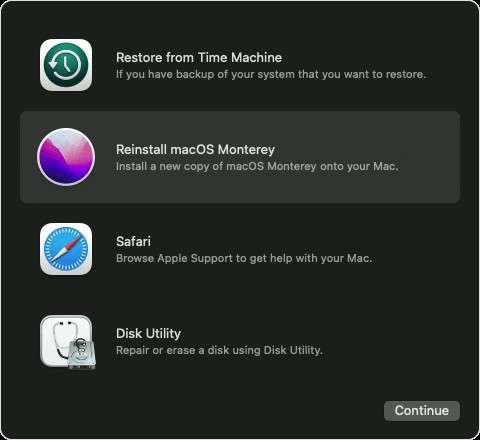
- Once back in the main Utilities Window, Select Reinstall macOS Monterey option and Click on Continue button at bottom.
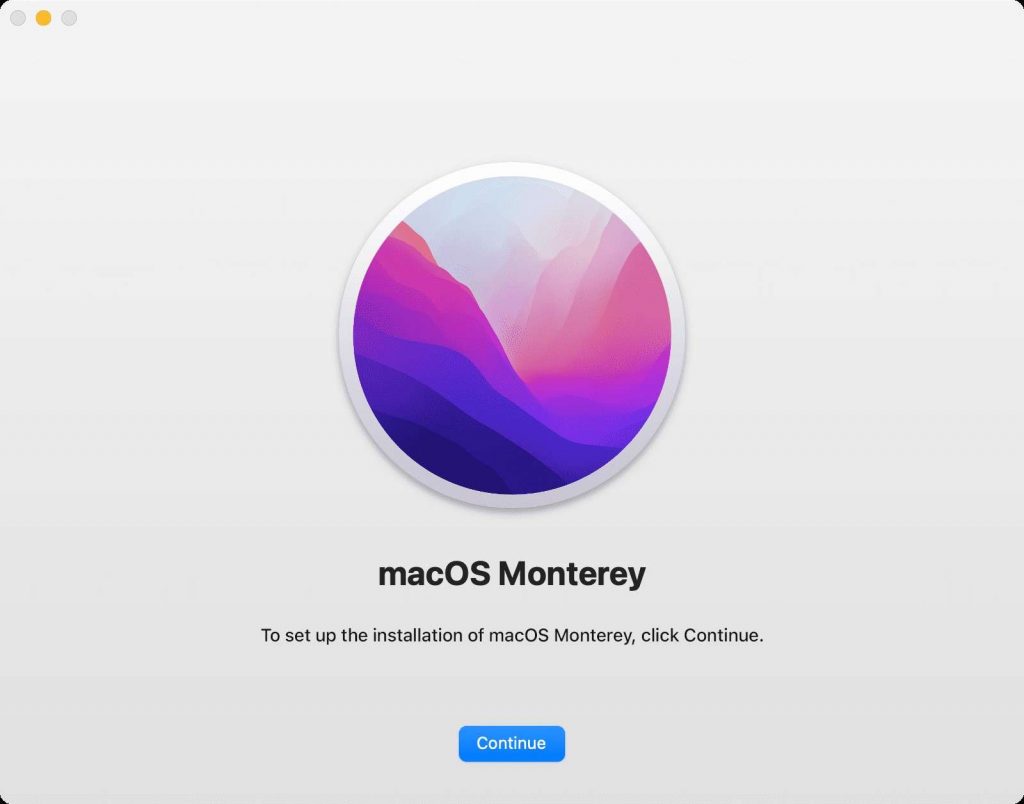
- This will lead you to the window for installing macOS Monterey and henceforth simply follow the instructions shown and select Yes or Continue.
- Few things to consider while Reinstalling macOS, if the installer prompts to login then provide credentials to continue. And if the installer asks for choice between disks, select Macintosh HD.
- Once the installation is completed it will be shown to the setup wizard for the MacBook Air.
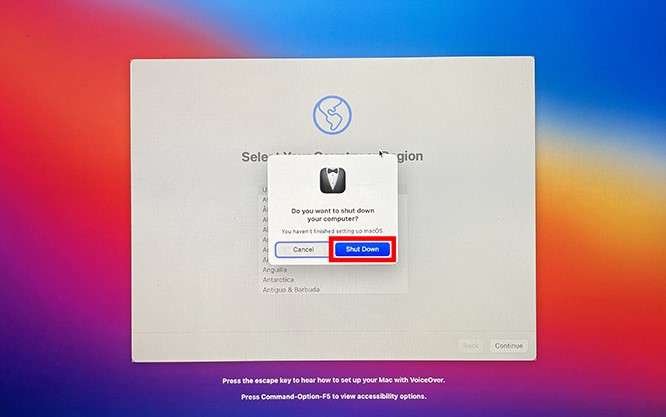
Step 4 : Command + Q
- If you want to continue to set up your MacBook Air after reinstalling macOS, then follow the instructions provided and it will be as fresh as an out of the box experience.
- But if you are selling, trading or giving it away then Press Command + Q keys to show you option for shutdown. Then simply select the Shutdown button so that the next person can continue setting up the MacBook Air.
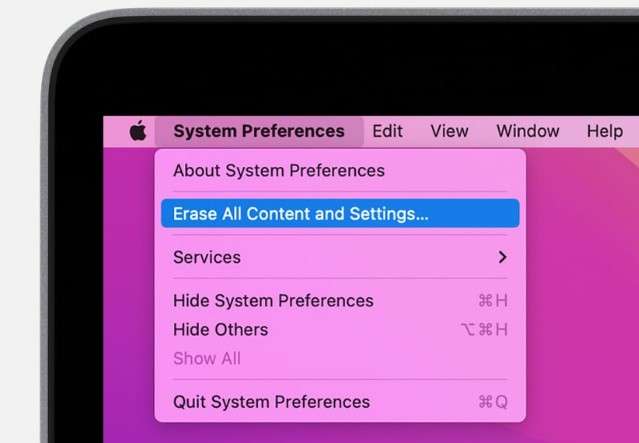
# If you want to Factory Reset MacBook Air upgraded to macOS Monterey with Apple Silicon processor or with Apple T2 security Chip. Then you have to follow below steps :
- The latest macOS Monterey provides Erase All Content and Settings features, which lets users quickly and securely erase all data from their MacBook Air while still keeping current macOS intact.
- In case you have used Boot Camp to install Windows then remove Windows and its partitions before it prompts to erase other volumes as well.
- To begin, Go to Apple Menu > System Preferences. From the dropdown menu, select ‘Erase All Content and Settings’.
- The Erase Assistant will prompt you to provide administrator credentials to continue. Provide the details and Click Ok.
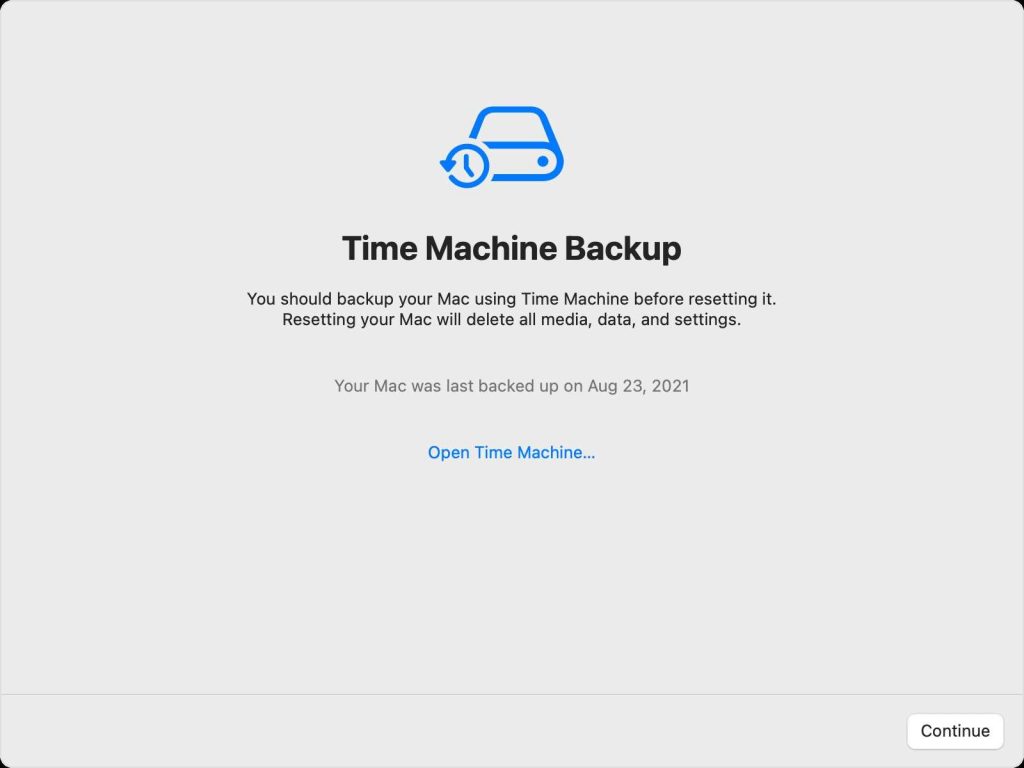
- When asked to backup your MacBook Air before resetting, you can launch Time Machine and back up to external storage or instead click on Continue to proceed without making a backup as per your requirements.
- After you Select Continue button, you will be directed to Window to select your settings, media, data and other items to be erased.
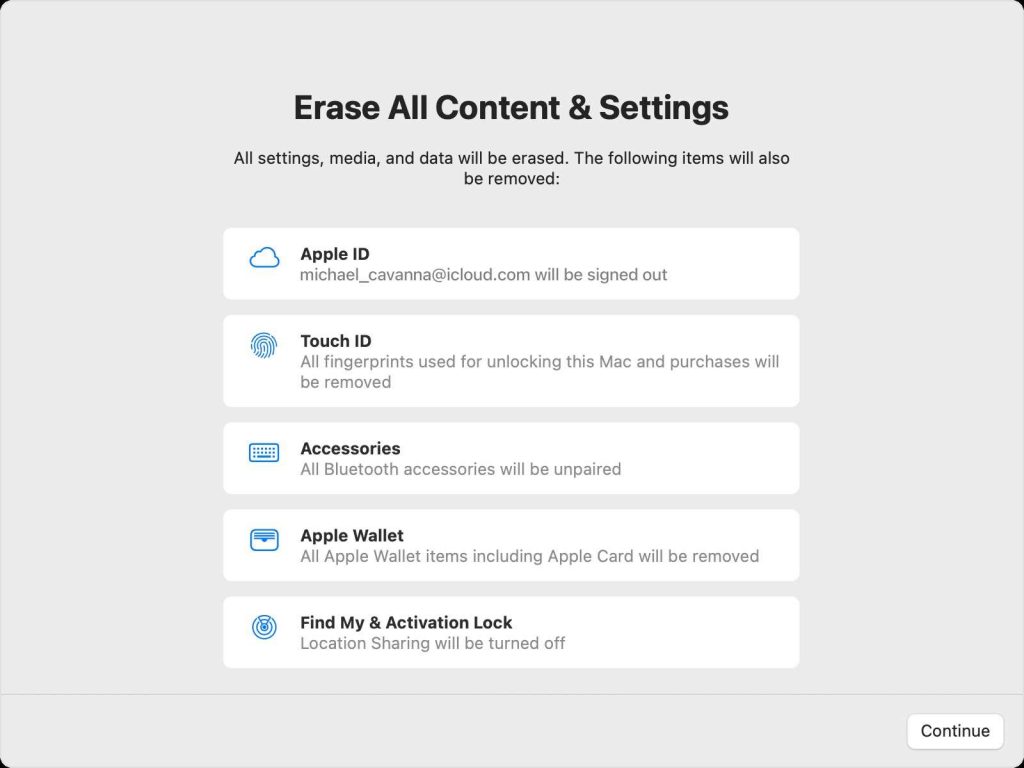
- Again when prompted then login with your Apple ID and continue.
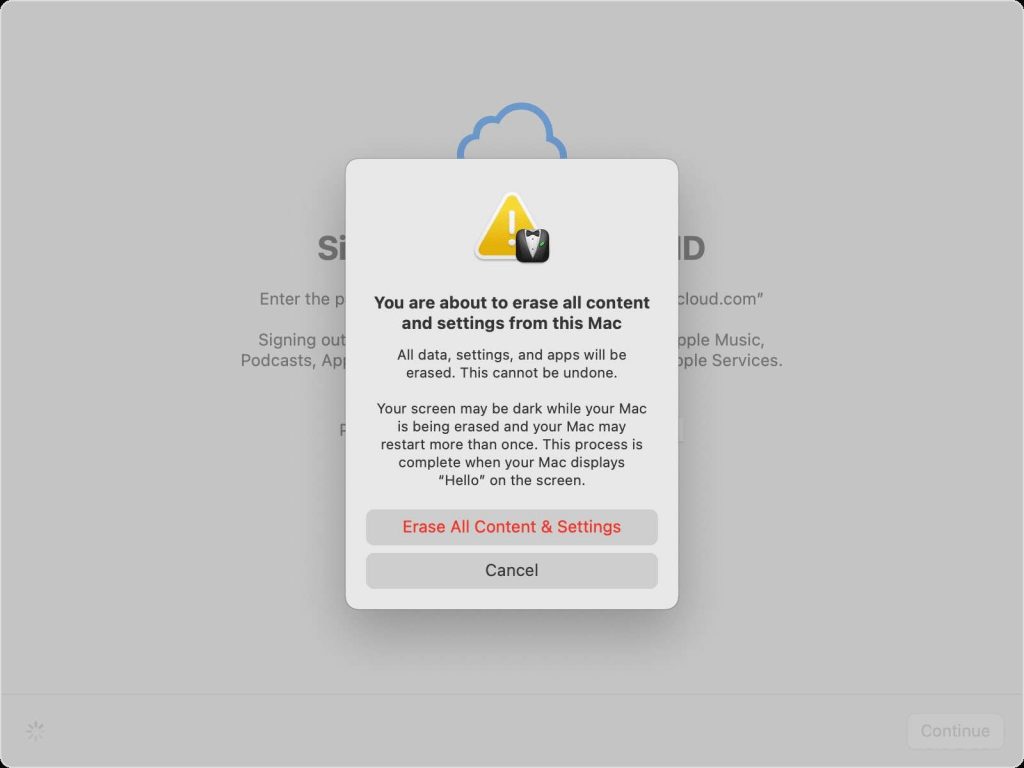
- Finally Click on ‘Erase All Content & Settings’ Button in Red to confirm erasing all the data from your MacBook Air.
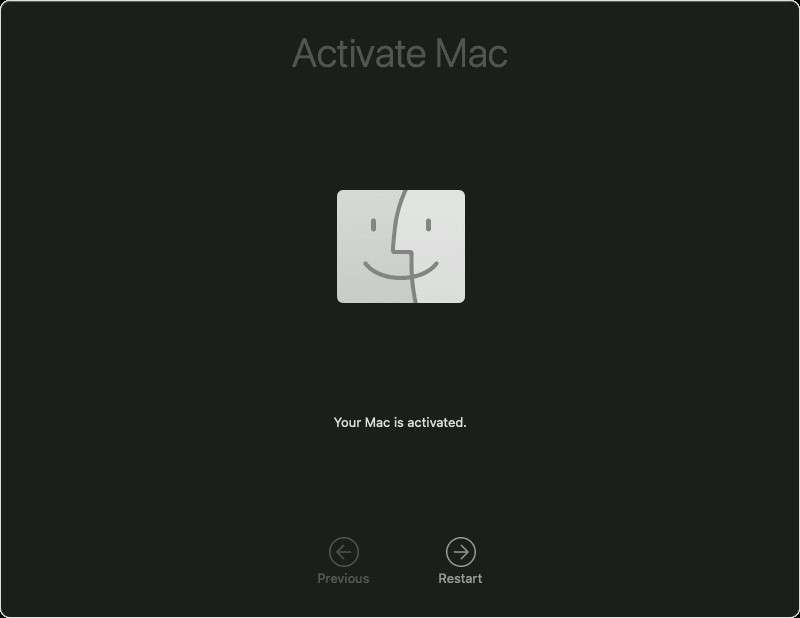
- While your MacBook Air is restarting it might ask to connect to WiFi. When prompted, connect the device to internet and when your MacBook Air is activated, Click on Restart button.
- Once the MacBook Air is restarted, a Setup guide is shown just like when it was from out of the box.
Now you know how to factory reset MacBook Air and MacBook Air M1.
Wrap Up –
Depending on the macOS versions and the processors used in your MacBook Air, select the procedure from above to Factory Reset options. In either case you can erase all the files and settings from your MacBook Air to make it a fresh MacBook Air from out of the box like brand new. We suggest you make sure to keep a backup before moving forward with these steps.