


Do you wish to transfer files between iPhone and Mac? Let us learn how to do so using different methods in this blog. The world we live in is rapidly depending on sharing data with each other. And then it comes time to move files between your phone to your system or vice versa as well.
Now transferring files between your iPhone and your Mac System is going to be a very frequent activity you would perform, so it is highly recommended to know all the possible ways to do the same.
Here we have curated a list of various ways for you to aid in transferring files between iPhone and Mac relatively easily and efficiently.
Methods To Transfer Files Between iPhone and Mac –
Below are the seven methods you can follow to transfer files from your iPhone to Mac or from your Mac to iPhone easily and efficiently without any data loss.
Method 1: iTunes File Sharing
The most common method to transfer files between iPhone and Mac is using iTunes file sharing. Using iTunes you can mostly transfer files created by keynote, pages, or number app. Make sure you have the latest version of macOS and iTunes installed on your Mac. Steps to follow to transfer files using iTunes –
- Connect your iPhone to your Mac using a USB Cable.
- Now launch the iTunes app on your Mac system, then Select your iPhone device on the top menu bar.
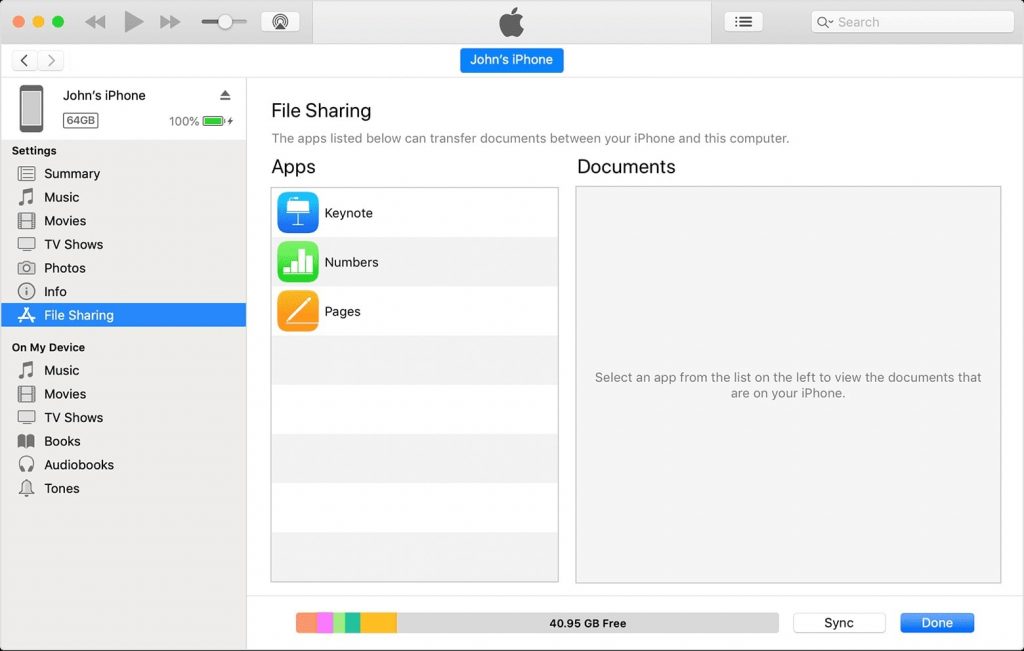
- Wait till all iPhone’s contents are loaded in the iTunes window, then Select the ‘File Sharing’ option from the left sidebar menu.
- From the Apps section, select the app you want to share: Keynote, Numbers, or Pages.
- Click on the Add button to start sharing files. Select all the files you want to transfer from iPhone to Mac and Click on the Save button to select the location to store them on Mac.
Method 2: Using AirDrop
AirDrop is a built-in utility provided by Apple to transfer files between iOS and macOS easily over Bluetooth and WiFi Connection. Using AirDrop you can wirelessly transfer all types of files between your iPhone and Mac most efficiently. Step to follow for enabling AirDrop file transfer on iPhone and Mac –
- On your iPhone, Go to Settings and Then General > AirDrop. Here you should Select ‘Everyone’ instead of the ‘Contacts Only’ option. Along with this Turn on both Bluetooth and WiFi on your iPhone.
- Now on your Mac System, Go to Finder > Go > AirDrop. Here set the ‘Allow me to be discovered’ option to ‘Everyone’, which will enable AirDrop. And also make sure to turn ON both Bluetooth and WiFi on your Mac.
- To share files from Mac to iPhone, simply drag and drop the intended file on the recipient and then Click ‘Done’ to transfer the file.
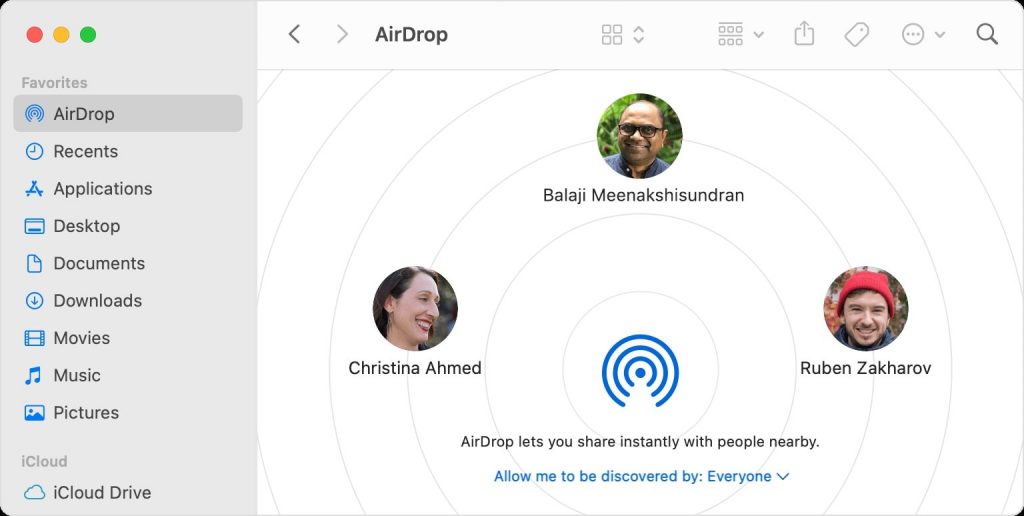
- To share files from iPhone to Mac, Select the Share button on the App, choose AirDrop then choose the recipient, and then click ‘Done’ to transfer the file.
Method 3: Email Attachments
As the oldest trick in the books, transferring files via email is among the most used methods for a long period. Although it works flawlessly, you should consider this method only if the files you want to transfer are relatively small in size.
- To transfer files from Mac to iPhone, you just need to create an email with files you want to transfer as attachments on your Mac browser and send the email to your own account. And open the same email from iPhone to download the attachments.
- To transfer files from iPhone to Mac, you need to create an email with attachments of the file intended to transfer and send it to your own account. Now open the same email on your Mac to download the files.
Method 4: Via iCloud Drive
Another efficient method to transfer files between iPhone and Mac is through iCloud Drive. Considering it is provided by Apple as cloud storage you can access the data across any device and platform easily with the same Apple ID. Steps to follow to enable iCloud Drive syncing on iPhone and Mac –
- Turn on iCloud Drive on your iPhone by opening the Settings app, Selecting your profile icon, and then Selecting ‘iCloud’. Inside the iCloud settings page, at the bottom enable the ‘iCloud Drive option.
- Next turn on iCloud Drive on your Mac System. Select the Apple icon, Then go to System Preferences > iCloud > iCloud Drive.
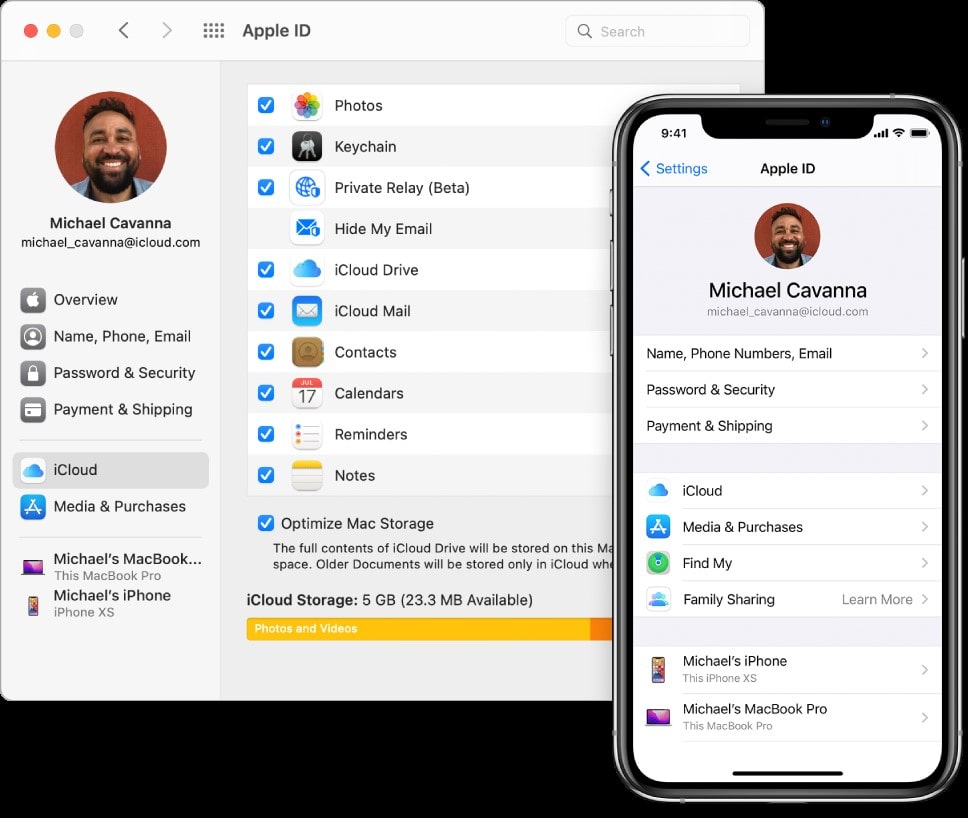
- Now to transfer files from either iPhone or Mac just simply upload the files to iCloud from the source and access the same from the target device.
Method 5: Dropbox or Google Drive
Just like iCloud, you can always use other Cloud Storage platforms like Dropbox or Google Drive to shave files across iPhone and Mac easily, the only caveat is to have a stable internet connection. Steps to follow to transfer files using Dropbox or Google Drive –
- Download and install either Dropbox or Google Drive on both iPhone and Mac systems from its official website or App Store.
- Now login to Dropbox or Google Drive on both iPhone and Mac using the same account details.
- To transfer files from Mac to iPhone, simply upload the files to Dropbox or Drive from your Mac, and access the same files from iPhone.
- To transfer files from iPhone to Mac, you need to upload the files to Dropbox or Drive and access the same files from your Mac with the same account.
Method 6: USB or WiFi Syncing
From macOS Catalina (10.15) onwards, you can easily transfer files between iPhone and Mac using a USB Cable connection or WiFi Connection by Syncing.
Steps to transfer files using the USB cable –
- Connect your iPhone to the Mac system using a USB Cable.
- Go to Finder and Select your iPhone on the sidebar.
- Now select the files you want to transfer and then you will see the list of apps to send to.
- Just drag the file or files from the Finder window onto the app to transfer from Mac to iPhone.
- Similarly, Click the disclosure triangle beside an app to see its files on iPhone, then drag the file to Finder Window.
Steps to transfer files using WiFi Syncing –
- Connect your iPhone to Mac using a USB cable, then Go to Finder and Select your iPhone in the sidebar. Select the General tab at the top of the window and then select the ‘Show this [device] when on WiFi’ option.
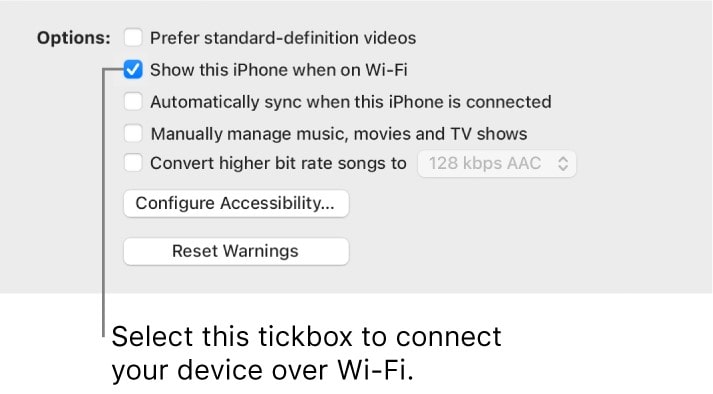
- Then based on your preferences set the syncing setting and Click the ‘Apply’ Button.
- Henceforth every time your iPhone and Mac are connected over WiFi, you can select the iPhone in the sidebar and sync it.
Method 7: Third-party file transfer software
To further reduce your work and make it even easier to transfer files between iPhone and Mac, there are plenty of third-party utilities available to transfer files with just a click of a few buttons. These iPhone file transfer tools help transfer all types of file types and formats from your iOS device to your Mac system.
Wrap up –
Transferring files between your iPhone and Mac can be performed in various methods as seen above. But mostly it depends on your preference of file types and file size. Depending on your file types and size choose wisely the preferred method which best suits your needs to file transfer between Mac & iPhone.
We recommend the best ways which are most comfortable for you, transfer files from iPhone to Mac AirDrop feature. Or the traditional way using the USB cable or iCloud storage when nothing else works.
Also Read: